What is the best way to water my Spider plant?
When watering the Spider plant, you should aim to use filtered water that is at room temperature. Filtered water is better for this plant, as tap water can contain particles that are harmful to its health. The reason that the water should be at room temperature or slightly warmer is that the Spider plant comes from a warm environment, and cold water can be somewhat of a shock to its system. Also, you should avoid overhead watering for this plant, as it can cause foliage complications. Instead, simply apply your filtered room temperature water to the soil until the soil is entirely soaked. Soaking the soil can be very beneficial for this plant as it moistens the roots and helps them continue to spread through the soil and collect the nutrients they need.
![more]()
What should I do if I water my Spider plant too much or too little?
Both overwatering and underwatering will be detrimental to the health of your Spider plant, but overwatering is a far more common issue. When this species receives too much water, its stems and leaves may begin to wilt and turn from green to yellow. Overwatering over a prolonged period may also lead to diseases such as root rot, mold, and mildew, all of which can kill your plant. Underwatering is far less common for the Spider plant, as this plant has decent drought tolerance. However, underwatering remains a possibility, and when it occurs, you can expect to find that the leaves of your Spider plant have become brittle and brown. It is crucial that you notice the signs of overwatering as soon as possible when caring for your Spider plant. Some of the diseases that arise from overwatering, such as root rot, may not be correctable if you wait too long. If you see early signs of overwatering, you should reduce your watering schedule immediately. You may also want to assess the quality of soil in which your Spider plant grows. If you find that the soil drains very poorly, you should replace it immediately with a loose, well-draining potting mix. On the other hand, if you find signs that your Spider plant is receiving too little water, all you need to do is water more regularly until those signs have subsided.
![more]()
How often should I water my Spider plant?
If your plant is in a pot. The most precise way to decide whether your Spider plant needs water is to plunge your finger into the soil. If you notice that the first two to three inches of soil have become dry, it is time to add some water. If you grow your Spider plant outdoors in the ground, you can use a similar method to test the soil. Again, when you find that the first few inches of soil have dried out, it is time to add water. During the spring and early fall, this method will often lead you to water this plant about once every week. When extremely hot weather arrives, you may need to increase your watering frequency to about twice or more per week. With that said, mature, well-established the Spider plant can show an admirable ability to withstand drought.
![more]()
How much water does my Spider plant need?
When it comes time to water your Spider plant, you should not be shy about how much water you give. With the first two to three inches of soil dry, this plant will appreciate a long and thorough watering. Supply enough water to soak the soil entirely. The amount of water you add should be enough to cause excess water to flow through the drainage holes at the bottom of your pot. If you don’t see excess water draining from the pot, you have likely underwatered your plant. But do not let the water accumulate inside the soil, which will be very dangerous to the plant as well. Alternatively, a lack of water draining through the pot could indicate poorly draining soils, which is detrimental to the health of this plant and should be avoided. If the plant is outside, 1 inch of rain per week will be sufficient.
![more]()
How should I water my Spider plant at different growth stages?
The water needs of the Spider plant can change depending on growth stages as well. For example, when your Spider plant is in the first few years of its life, or if you have just transplanted it to a new growing location, you will need to give more water than usual. During both of those stages, your Spider plant will put a lot of energy towards sprouting new roots that will then support future growth. For those roots to perform their best, they need a bit more moisture than they would at a more mature phase. After a few seasons, your Spider plant will need much less water. Another growth stage in which this plant may need more water is during the bloom period. Flower development can make use of a significant amount of moisture, which is why you might need to give your Spider plant more water at this time.
![more]()
How should I water my Spider plant through the seasons?
The Spider plant will have its highest water needs during the hottest months of the year. During the height of summer, you may need to give this plant water more than once per week, depending on how fast the soil dries out. The opposite is true during the winter. In winter, your plant will enter a dormant phase, in which it will need far less water than usual. In fact, you may not need to water this plant at all during the winter months. However, if you do water during winter, you should not do so more than about once per month. Watering too much at this time will make it more likely that your Spider plant will contract a disease.
![more]()
What's the difference between watering my Spider plant indoors and outdoors?
It is most common to grow the Spider plant indoors for any gardener that does not live in temperate and tropical regions. Those gardeners should consider the fact that soil in a container can dry out a bit faster than ground soil. Also, the presence of drying elements such as air conditioning units can cause your Spider plant to need water on a more frequent basis as well. if you planted it outside. When that is the case, it’s likely you won’t need to water your Spider plant very much at all. If you receive rainfall on a regular basis, that may be enough to keep your plant alive. Alternatively, those who grow this plant inside will need to water it more often, as allowing rainwater to soak the soil will not be an option.
![more]()
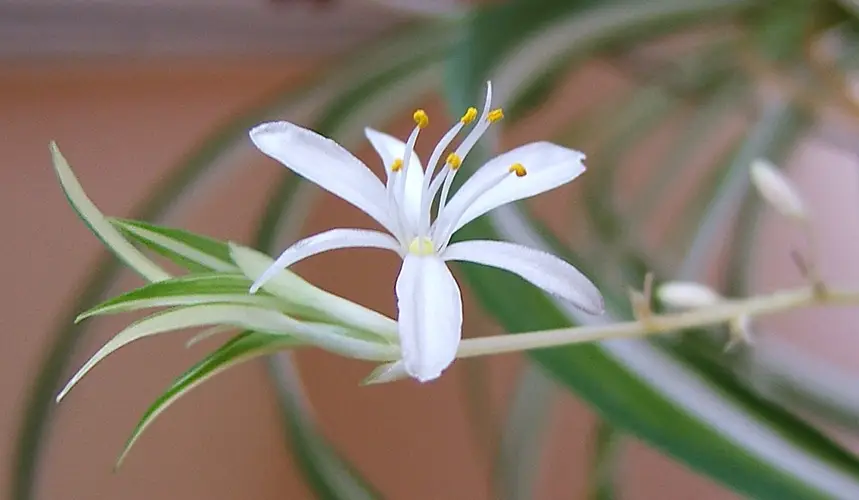
Is pruning necessary for my Spider plant?
It is helpful to lightly prune this plant periodically during the spring and summer. When performing this light pruning, you should search for leaves that have wilted, become discolored, show signs of disease, or have died completely. Remove dead or damaged leaves by cutting their petioles, or trimming off stems that have died. This will increase the light and ventilation of the plant and help it to grow. Some gardeners also choose to remove the flower buds of the Spider plant. However, removing flower buds before they open is a strictly aesthetic decision that will emphasize the beauty of this plant’s showy leaves.
![more]()
When should I prune my Spider plant?
You can prune your Spider plant any time you notice dead, diseased, or damaged leaves during the growing season. Once you notice such a leave, locate an unwanted leaf, then follow its stem all the way to the bottom of petiole. Removing dead stems will increase the light and ventilation of the plant and help it to grow. you can cut its stem just above the soil’s surface to remove it. Such pruning can take place as needed during spring and summer. Also, this plant can bloom any time between spring and fall, and some gardeners choose to remove flower buds before they have a chance to open. Removing unopened flower buds allows this plant to focus most of its growing energy on its beautiful leaves. However, pruning in this manner does not necessarily influence the plant’s overall health.
![more]()
How do I prune my Spider plant?
Pruning the Spider plant is as easy as waiting until you notice dead or damaged leaves on your plant. When you recognize these leaves, equip yourself with a pair of sharp and sterile hand pruning shears. Hand pruning shears will work best as larger tools like loppers will not be well suited to the precise cuts you need to make. Once you have a proper set of pruning tools, locate an unwanted leaf, then follow its stem all the way to the bottom of petiole. Removing dead stems will increase the light and ventilation of the plant and help it to grow. Cut the stem just above where it exits the soil to remove it entirely. If you wish to stop this plant from flowering, you can use the same pruning shears to remove any buds before they open. Finally, you may prefer to just trim off dead or damaged portions of the plant, including deadheading spent flowers, to keep it looking its best. This can be done at any time of year. Diseased or damaged stems should be cut right at the soil line and removed completely. Blooms should be cut off just below the flower head.
![more]()
What should I do after pruning my Spider plant?
Since pruning for the Spider plant should take place periodically throughout the season, what you do after pruning can vary. For instance, if you prune to remove selected leaves and stems from your Spider plant, you won’t need to do anything except continue your regular maintenance routine. At times, you may choose to remove healthier leaves and include them in a display of cut flowers and foliage. However, there is no crucial maintenance task to perform for this plant after typical pruning. The only thing to note is that when watering after pruning, you need to be careful not to touch the wound to prevent fungus from infecting the plant through the fresh wound. Placing Spider plant in a well-ventilated location will also help the wounds to dry out and heal in time. The timely replenishment of Spider plant after pruning will help the Spider plant to recover as soon as possible.
![more]()
Are there any important tips when pruning my Spider plant?
For your major pruning, use sharp pruning sheers that will make clean cuts to avoid damaging your plants. As you are pruning your Spider plant, step back occasionally to check the appearance of the plant to make sure it has the shape you want and that you are pruning it symmetrically. If the overall growth of the plant is weak, the flowers need to be pruned back in time for flowering to be able to save nutrients for leaf growth and allow the plant to grow more vigorously.
![more]()
What type of sunlight does Spider plant need?
Spider plant typically needs full, indirect sunlight in order to thrive indoors. This means that the plant should be exposed to bright sunlight that doesn’t hit it directly from a window or another light source, like a grow light. You can easily protect it from direct sunlight by placing a sheer curtain between your Spider plant and the window, or by placing it behind a part of the window with a dark screen.
![more]()
How can I avoid damaging new Spider plant with sunlight?
If this is your first time bringing your Spider plant home, then it might be a good idea to try to ease it into the sunlight it needs, rather than place it in bright, indirect light right away. Over the course of two weeks or so, you can slowly move your plant into the sunlight to avoid shock or burning of the leaves from sudden intense light exposure. By easing it into the light, your Spider plant is much more likely to adapt to your home environment well.
![more]()
How can I tell if Spider plant is getting too much light?
Spider plant is one that can easily sunburn with too much sunlight. In the wild, these plants only receive mild, dappled light, filtered down from tree canopies. While they need more light than that to grow in our homes, too much can certainly cause issues. If your Spider plant is getting too much light, you’ll notice that the foliage begins to look bleached or washed out, the tips of leaves may turn yellow or brown and crispy, and it may even grow too quickly to support itself.
![more]()
What should I do if my Spider plant gets light damage?
Sunburn for plants is much less severe than sunburn for people. While it may look unsightly, crispy, burnt leaves can be removed if they’re too far damaged to recover, or over half of the leaf is damaged. However, you can also try trimming back the leaves just to remove any sunburn damage in an effort to save them, if there’s not too much discoloration. Move your Spider plant away from its light source to avoid future light damage.
![more]()
Does Spider plant need different light during different growth stages?
While some plants may be ready to face the sweltering sun straight out of the ground, Spider plant needs some time to build itself up enough to tolerate bright light. Propagated cuttings should receive only moderate indirect light, while new leaves during the growing season should be shielded a bit as well. The tender new leaves are more prone to sunburn than any other part of the plant.
![more]()
How can I tell if Spider plant isn’t getting enough light?
Fortunately, plants can communicate in their own language to convey whether they have adequate sunlight or not. Like most plants, your Spider plant will tell you if it isn’t getting enough sunlight. The most visible sign is when your plant becomes particularly dark, or there is no new growth on the plant from one season to the next. You’ll also notice that leaves that do grow in may remain smaller than others, since there isn’t enough light to photosynthesize to support large new leaves.
![more]()
How much sunlight should Spider plant get each day?
Depending on how bright the sunlight is that your Spider plant gets, the number of hours in a day may vary. If you have your plant in bright, indirect light, then there’s no need to try to restrict or increase the amount of time your plant gets this light each day. However, if light is less bright or further away from your Spider plant, then you can try to aim for at least eight hours of full light per day.
![more]()
What is the optimal temperature for Spider plant?
For this tropical plant to thrive, you’ll want to keep them between 75℉ and 90℉ (25-32℃). Each species can handle temperatures outside of this range, but keeping it within several degrees of these limits will ensure they grow to their maximum potential. As for its extreme temperature limits, any environment below 50℉ (10℃) or above 95℉ (35℃) will begin to hinder its growth and cause various aberrations to its leaves and stems. This is especially true with low temperatures; even a light frost can cause your tropical plants to perish. Cellular death can begin to happen at a rapid pace, with some species dying in as little as 12 to 24 hours.
![more]()
Does Spider plant require different temperatures for different growing phases?
While Spider plant doesn’t require any changes in temperature to enter different growing phases, it is important to stay consistent. Wild temperature fluctuations can slow down its growth regardless of its current phase, so it's always better to keep them in a controlled environment. That optimal temperature range of 75℉ and 90℉ (25-32℃) is vital to maintain, especially staying above the lower limit. Going above 90℉(32℃) isn’t ideal, but as tropical plant it won’t suffer too much. On the other hand, going below 50℉ (10℃) (and especially 40℉/5℃) will begin to directly damage this heat-loving plant species.
![more]()
Does Spider plant need different temperatures for different seasons?
Spider plant does not need different temperatures for different growing seasons. The most important step in seasonal care is to keep the environment within the optimal temperature range. That's why it's always best to keep this plant indoors. That way, you can control the temperature no matter what the climate is like outside. Light is also important for tropical species, with all of these plants preferring a partial side level of sun exposure. This means any light they receive needs to be dappled or filtered, with bright but indirect light being the best option when growing your plants indoors. Too much direct sunlight can negatively affect your plant’s leaves, reducing its growth potential.
![more]()
What are the temperature guidelines to keep your Spider plant healthy?
Tip #1: Don’t Leave Your Plant Near Windows in Colder Months If you want to make sure your plant isn’t exposed to colder temperatures, you may want to keep them away from windows. In colder months like late fall and winter, even the smallest draft can leak cold air into your home through cracks in your windows. While this air usually dissipates and warms up as it travels throughout your home, any plants placed in close proximity to the window will be affected. Move your tropical plants into an area where they will still get bright but indirect light, while making sure they won’t be affected by potential drafts. Tip #2: If You Find Dry Patches, Your Plant May Be Getting Too Much Sunlight or Heat You may notice the leaves become white or even scorched on a sunny day. These discolorations and unusual markings usually indicate that a plant is getting too much heat or sunlight, and it may be dehydrated. Excess light and heat will dry out the soil, stopping plants from getting the moisture they need to support their cellular structure. It also slows down or stops the process of photosynthesis, further hindering growth. If ignored for too long, these dry spots can spread and eventually result in the death of your plants. Tip #3: Avoid Frost at All Costs Colder temperatures and frost can damage your plants by causing ice crystals or disrupt normal physiological activity. This makes it nearly impossible for water to move freely throughout plant tissue, creating a deficit of moisture in their stems and leaves. You can tell a plant has been damaged by frost if it begins to suffer from hydrosis (it will appear as though it's soaked with water.) If the problem persists, your plants may begin shriveling and turning a dark brown or black hue. After that, the plant will almost certainly die.
![more]()
What is the best way to maintain the right temperature for my Spider plant?
The best way to maintain the right temperature range for Spider plant is by keeping an eye on both the climate and humidity. You’ll want to try to keep each species in a room where you have access to climate control, keeping the heat in the temperature range best mimics its natural habitat. The humidity levels will also have a direct effect on temperature, so it's important to monitor these as well. You can artificially raise the humidity of your growing space by using a humidifier or lightly misting the leaves with water. If you intend to grow this species outside, you may find it difficult to maintain the right balance of temperature and humidity. If temperatures begin to drop or the air becomes too dry, your best option is to find room within your home and move your plant inside. An indoor growing space will allow you to control the climate more closely, helping your plant reach its full potential.
![more]()
Why do I need to fertilize my Spider plant?
All plants rely on soil nutrients to facilitate their growth, and the Spider plant is no exception. However, it is not always a guarantee that the soil in which your plants grow will have all of the nutrients required. Fertilization and soil amendments help ensure that the plants in your garden not only have the basic nutrients they need but also that they get the nutrients that are specifically necessary to them. Spider plant needs fertilizer to ensure that its roots and stems continue to develop in a healthy way throughout the growing season. Fertilization will also help a Spider plant a set of leaves that looks fantastic, which is especially important for this plant since its foliage is its main point of ornamental appeal.
![more]()
When is the best time to fertilize my Spider plant?
A Spider plant will need the greatest amount of fertilizer during the seasons in which it is actively growing. This active growth phase typically spans most of the months that make up spring, summer, and early fall. Once winter ends, you should plan to feed your Spider plant about once every two to four weeks. Continue feeding at this rate until the fall months arrive. Once fall arrives, you can reduce your fertilization rate, reducing the amount of fertilizer you give gradually until you cease feedings entirely in anticipation of winter, when the Spider plant will have far less active growth.
![more]()
When should I avoid fertilizing my Spider plant?
Throughout most of the year, including spring, summer, and most of the fall, you should continue feeding your Spider plant regularly. The only exception to this is if you notice that your Spider plant has received too much fertilizer or if you have managed to fertilize your Spider plant incorrectly, causing fertilizer burn or some other issue that you'll need to remedy before returning to a regular feeding schedule. The only time of year when you should not fertilize a Spider plant is during winter. If you grow this plant indoors in an area where the winters are cold, it will enter a dormant phase during the winter. Feeding this plant during its dormant phase is not only unnecessary and unhelpful to this plant's growth, but it is also very likely to cause fertilizer burn.
![more]()
What type of fertilizer does my Spider plant need?
The fertilizer for a Spider plant has a specific blend of nutrients, each of which is present in relatively low amounts. An ideal fertilizer will have an N-P-K ratio of 3-1-2. However, a general-purpose fertilizer that has an even blend of nutrients can work well in some cases. Still, even when using a balanced fertilizer, the ratio number representing the volume of each nutrient should be at 10 or lower. The fertilizer you use can be either granular or liquid based. If you choose to use a liquid-based fertilizer, it is often best to dilute the strength by half. While there is not much downside to granular fertilizer, it is often most sensible to use liquid fertilizer, especially if you feed your Spider plant while you supply water.
![more]()
How do I fertilize my Spider plant?
The fertilizer that you purchase for your Spider plant will likely come with application instructions that you should follow in most cases. However, for a Spider plant, you should always fertilize just before or while you are watering the soil, as this will prevent the fertilizer from burning the plant's roots. If you use a slow-release granular fertilizer, you should sprinkle it on the soil and then provide water immediately after. If you use a liquid-based fertilizer, you should dilute it with water, apply it to the soil, then supply a bit more water. Diluting your fertilizer by at least half is especially important in spring and fall when the plant's growth is ramping up and decelerating, respectively.
![more]()
What happens if I fertilize my Spider plant too much?
Since it is advisable to fertilize your Spider plant every few weeks throughout the growing season, overfertilization is not often an issue. However, it remains possible for this to occur. If you overfertilize your Spider plant, you may notice accumulations of excess fertilizer on the soil’s surface and foliage discoloration. Fertilizer burn is the most common issue you should worry about when feeding a Spider plant. This issue occurs when you overfertilize, fail to dilute your fertilizer, or when don’t water during and after fertilization. In any of those cases, the fertilizer can draw moisture out of your plant’s roots, causing it to dry out. Often, fertilizer burn will manifest with browning and yellowing of this plant’s leaves.
![more]()